Instruction for Wigjig Beginner, Wigjig Deluxe and Centaur
Instruction for Wigjig Beginner, Wigjig Deluxe and Centaur
With this equipment, it is easy to create new jewelry designs. By using a breadboard and metal or plastic pins loops are formed from metal wire, which can then be used for creating jewelry pieces, such as earrings or necklaces.
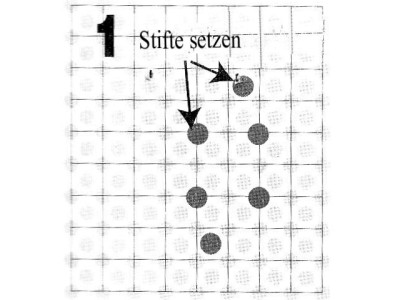
Choose and set your pins
After choosing your design and after you know know what kind of loops are required, first, the pins must be placed in the Whig Jig. In this case, the larger shall be the loops, the greater the pen must be. Furthermore, the thickness of the wire that is used has an important role. When the wire is thick and the part is small, there are problems in winding. In this case we have a wire of 0,8 mm diameter and we choose medium length pins.
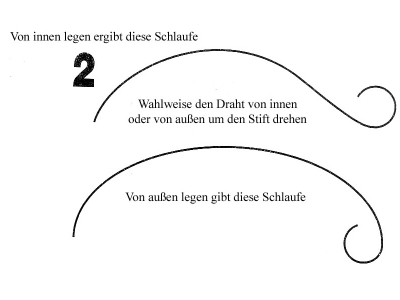
Chosse the winding directio
Depending on what your subject requires, we need to specify the winding direction and also determine if we want to run the wire inside or around the outside of the pen. As you can see on the picture on the left, then the loop has a slightly different look. The choice then depends on the desired subject and is simply a matter of taste.
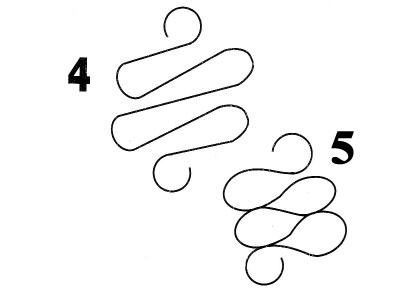
So should look the loops we want to create
Thus, the loops get the desired shape, the pins must be inserted as shown in Figure 3 in the Whig Jig. The exact distances will ultimately depend on the size of the desired loops and also on the thickness of the wire that is used. Just try with cheap wire before working with the actual silver-gold or copper wire. Very important is the wire compliant at each loop that is equal to either run inside or outside.
Tips and Tricks
Am Besten ist es direkt mit einer Schlaufe zu beginnen, da man einen besseren Halt beim Biegen hat. Man kann aber auch den Anfang des Drahtes in ein benachbartes Loch stecken und dann den Draht um den ersten Stift ziehen. Wenn z.B. Ohrhänger aus diesem Schlaufendesign gefertigt werden sollen, dann kann man anschließend mit einer Rundzange eine Miniöse biegen, um das fertige Teil in einen Ohrhaken einzuhängen. Wenn es aber ein Halskettenelement werden soll, dann beginnt man besser direkt mit einer Schlaufe.
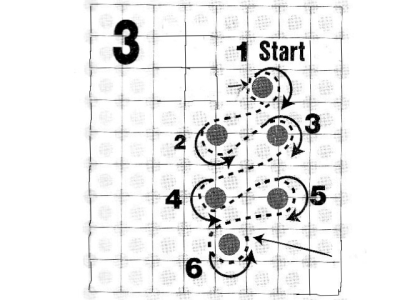
Den Draht der Reihenfolge nach von 1-6 um die Stifte ziehen. Es ist empfehlenswert noch zusätzlich einen Schraubenzieher zu Hilfe zu nehmen, um den Draht gleichmäßig um den jeweiligen Stift zu drücken und ihn auch unten zu halten. Man muss dabei aber darauf achten, den Draht nicht zu beschädigen. Wie in Bild 4 und 5 gezeigt, hat man noch die Möglichkeit lockere oder festere Schlaufen zu formen. Größere, dicht aneinanderliegende Schlaufen erhält man, indem man den Draht einen Tick länger läßt, bevor man die nächste Schlaufe biegt. So ergibt sich dann ein unterschiedliches Design.
Consistant work
is very important to get a usable result. If it does not work in the first time, do not be discouraged. Each time you gain experience and the results are going always better. Just try with cheap brass wire first. You can try design in this example also modify it by using different sized pins. Check out our other design examples. By the time you start to think by themselves and make your own designs.
At the end hammer
When the design is completed, you should still hammer the wire on an anvil gently with a cloth, but without to hammer the wire flat, it is only to fix the whole object. But you can also hammer the wire flat, which turn results in a completely new design and the wire in addition more stability. At the compounds at the points where loops touch or intersect, you can also increase with a small drop of superglue more stability. It would be very proffessionell in use of gold or silver wire to solder the intersections. Absolutely necessary is it not. Ultimately it is always related to the use and of the associated stress.
©Copyright by Magic and Arts 2014